Critical Review -
As seen in my previous blog post the 1:1 Motorbike tank proved a success but also instantly proved to be the most difficult. As the shape required the implementation of multiple techniques due to its non-uniform shape. Through a short personal reflection on the resulting piece, I aim to identify its strengths and weaknesses, as well as an alternative approach to the fabrication process.
Strengths:
Prior knowledge
By understanding basic fabrication techniques and how to apply them to achieve specific shapes, it made it a lot easier to plan and combine these techniques to create a non-linear shape.
 |
| Previous work from Assignment 1 |
The Torus's shape
The torus indentation was truly the highlight of the piece, whereby it had a uniform curvature but also had a narrow starting point and gradually widened and flattened out around the front end of the tank.
 |
| Torus curvature |
Only one piece of metal
As seen in the pictures the side piece of the tank has a lot of depth to it, whereby the flat sections curls around to make up the front of the tank whilst not affecting the dimensions of the torus indentation. By forcing ourselves to use one piece as compared to two it helps in emphasizing the overall uniformity of the tank because fewer parts would need to be welded together. The picture below shows where the part would have been separated.
 |
| Separation region |
Weaknesses:
The Smoothness of surface finish
Due to this project piece being created using traditional forming techniques there are a lot of small manipulations that are required to achieve its final shape. It is because there are a lot of manipulations, that every change made also decreases the chance of making it as uniform as possible. This was clearly shown in the surface finish of the metal, whereby the surface has a lot of very small indentation where the hammer has hit the aluminum.
 |
| Surface defects |
Symmetrical accuracy
The symmetrical accuracy was also affected by the same problem as the surface finish, whereby numerous small changes are made to the metal achieve the final form. My piece of the tank was a piece that had to be symmetrically created twice, I did the left side, whereas my team member did the right. Attempting to make the two sides perfectly symmetrical is near impossible as there are too many variables that change the way we both stretch and shrink the metal.
 |
| Comparing the two sides |
Finishing polish
Becuase of the fabrication techniques, especially the use of a mallet to stretch and shrink the aluminum. Numerous indentations were made which proved to extremely problematic when polishing the surface as the imperfections would become visible.
Alternative approach
Increase the use of the English Wheel
In an attempt to eliminate the first and third weakness I would approach the fabrication process with a more gentle metal forming approach. By minimizing the amount of hammering needed, indentations and imperfection can be reduced. The English wheel in this case, would be the primary tool used as it uses a gentle and uniform method for stretching and shrinking metal. I also got inspired by this approach by a quote said by a professional metalsmith who said.
A good metal smith can create just about anything using an English Wheel
 |
| Results of only the English wheel |
Mold / Improved Buck
This new approach would draw inspiration from a previous assignment whereby we created a torus. When creating the torus we used a wooden stump with a cutout to help create the initial shape. However, for this project, creating a wooden mold that would be fabricated using CNC methods would allow for a much more symmetrical and uniform building approach. This is because this mold would aid in creating the mass of the form and it could be used multiple times, ensuring each time it would produce a piece as accurate as one another.
Similar to the molding approach and the method we actually used in the project, would be to make a much stronger buck that could withstand strong forces, thus allowing me to use it as a mold as well. In this project, we used 3mm MDF to create a waffled buck, by using much thicker and stronger timber you could use the CNC machine to create the same buck but improve its overall strength due to the new material properties.
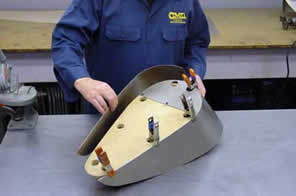 |
| Improved buck with holes to clamp metal to it |
Preparation
A common technique used by professionals, which I stubbornly ignored was the preparation process before any shaping took place. By marking out the exact areas which I wanted to stretch and shrink would have ensured a lot more accuracy, thus resulting in a more uniform end product.
 |
Preparation guide
|
A virtual analysis should of also be done as part of the preparation, as it can aid in visualizing the topology of the surface as well as its curvature. Which can better help predict how much and what forces should be applied where.
 |
Rhino curvature analysis
|
A common technique used by professionals, which I stubbornly ignored was the preparation process before any shaping took place. By marking out the exact areas which I wanted to stretch and shrink would have ensured a lot more accuracy, thus resulting in a more uniform end product.
 |
Karamba topology analysis
|
Final statement
It is evident that through a simple critical review, there are multiple new/changed techniques and methods that would be applied to the same project, to then hopefully result in a more efficient fabrication process by a more professional quality finish.


Comments
Post a Comment